Reliable Oilfield Services
ROS home

Burner Management Controller (BMS)


User Manual


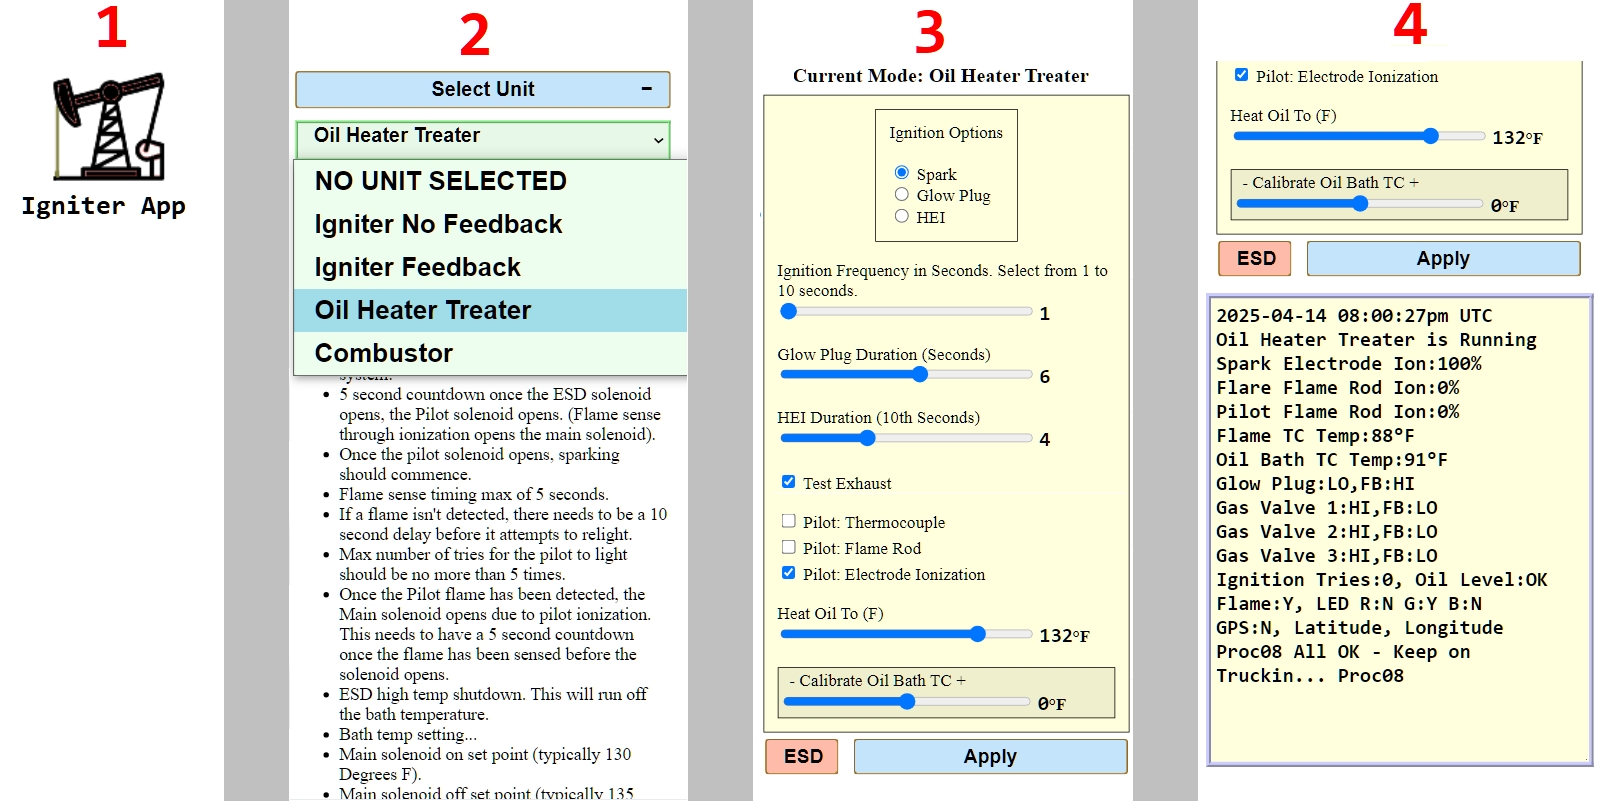
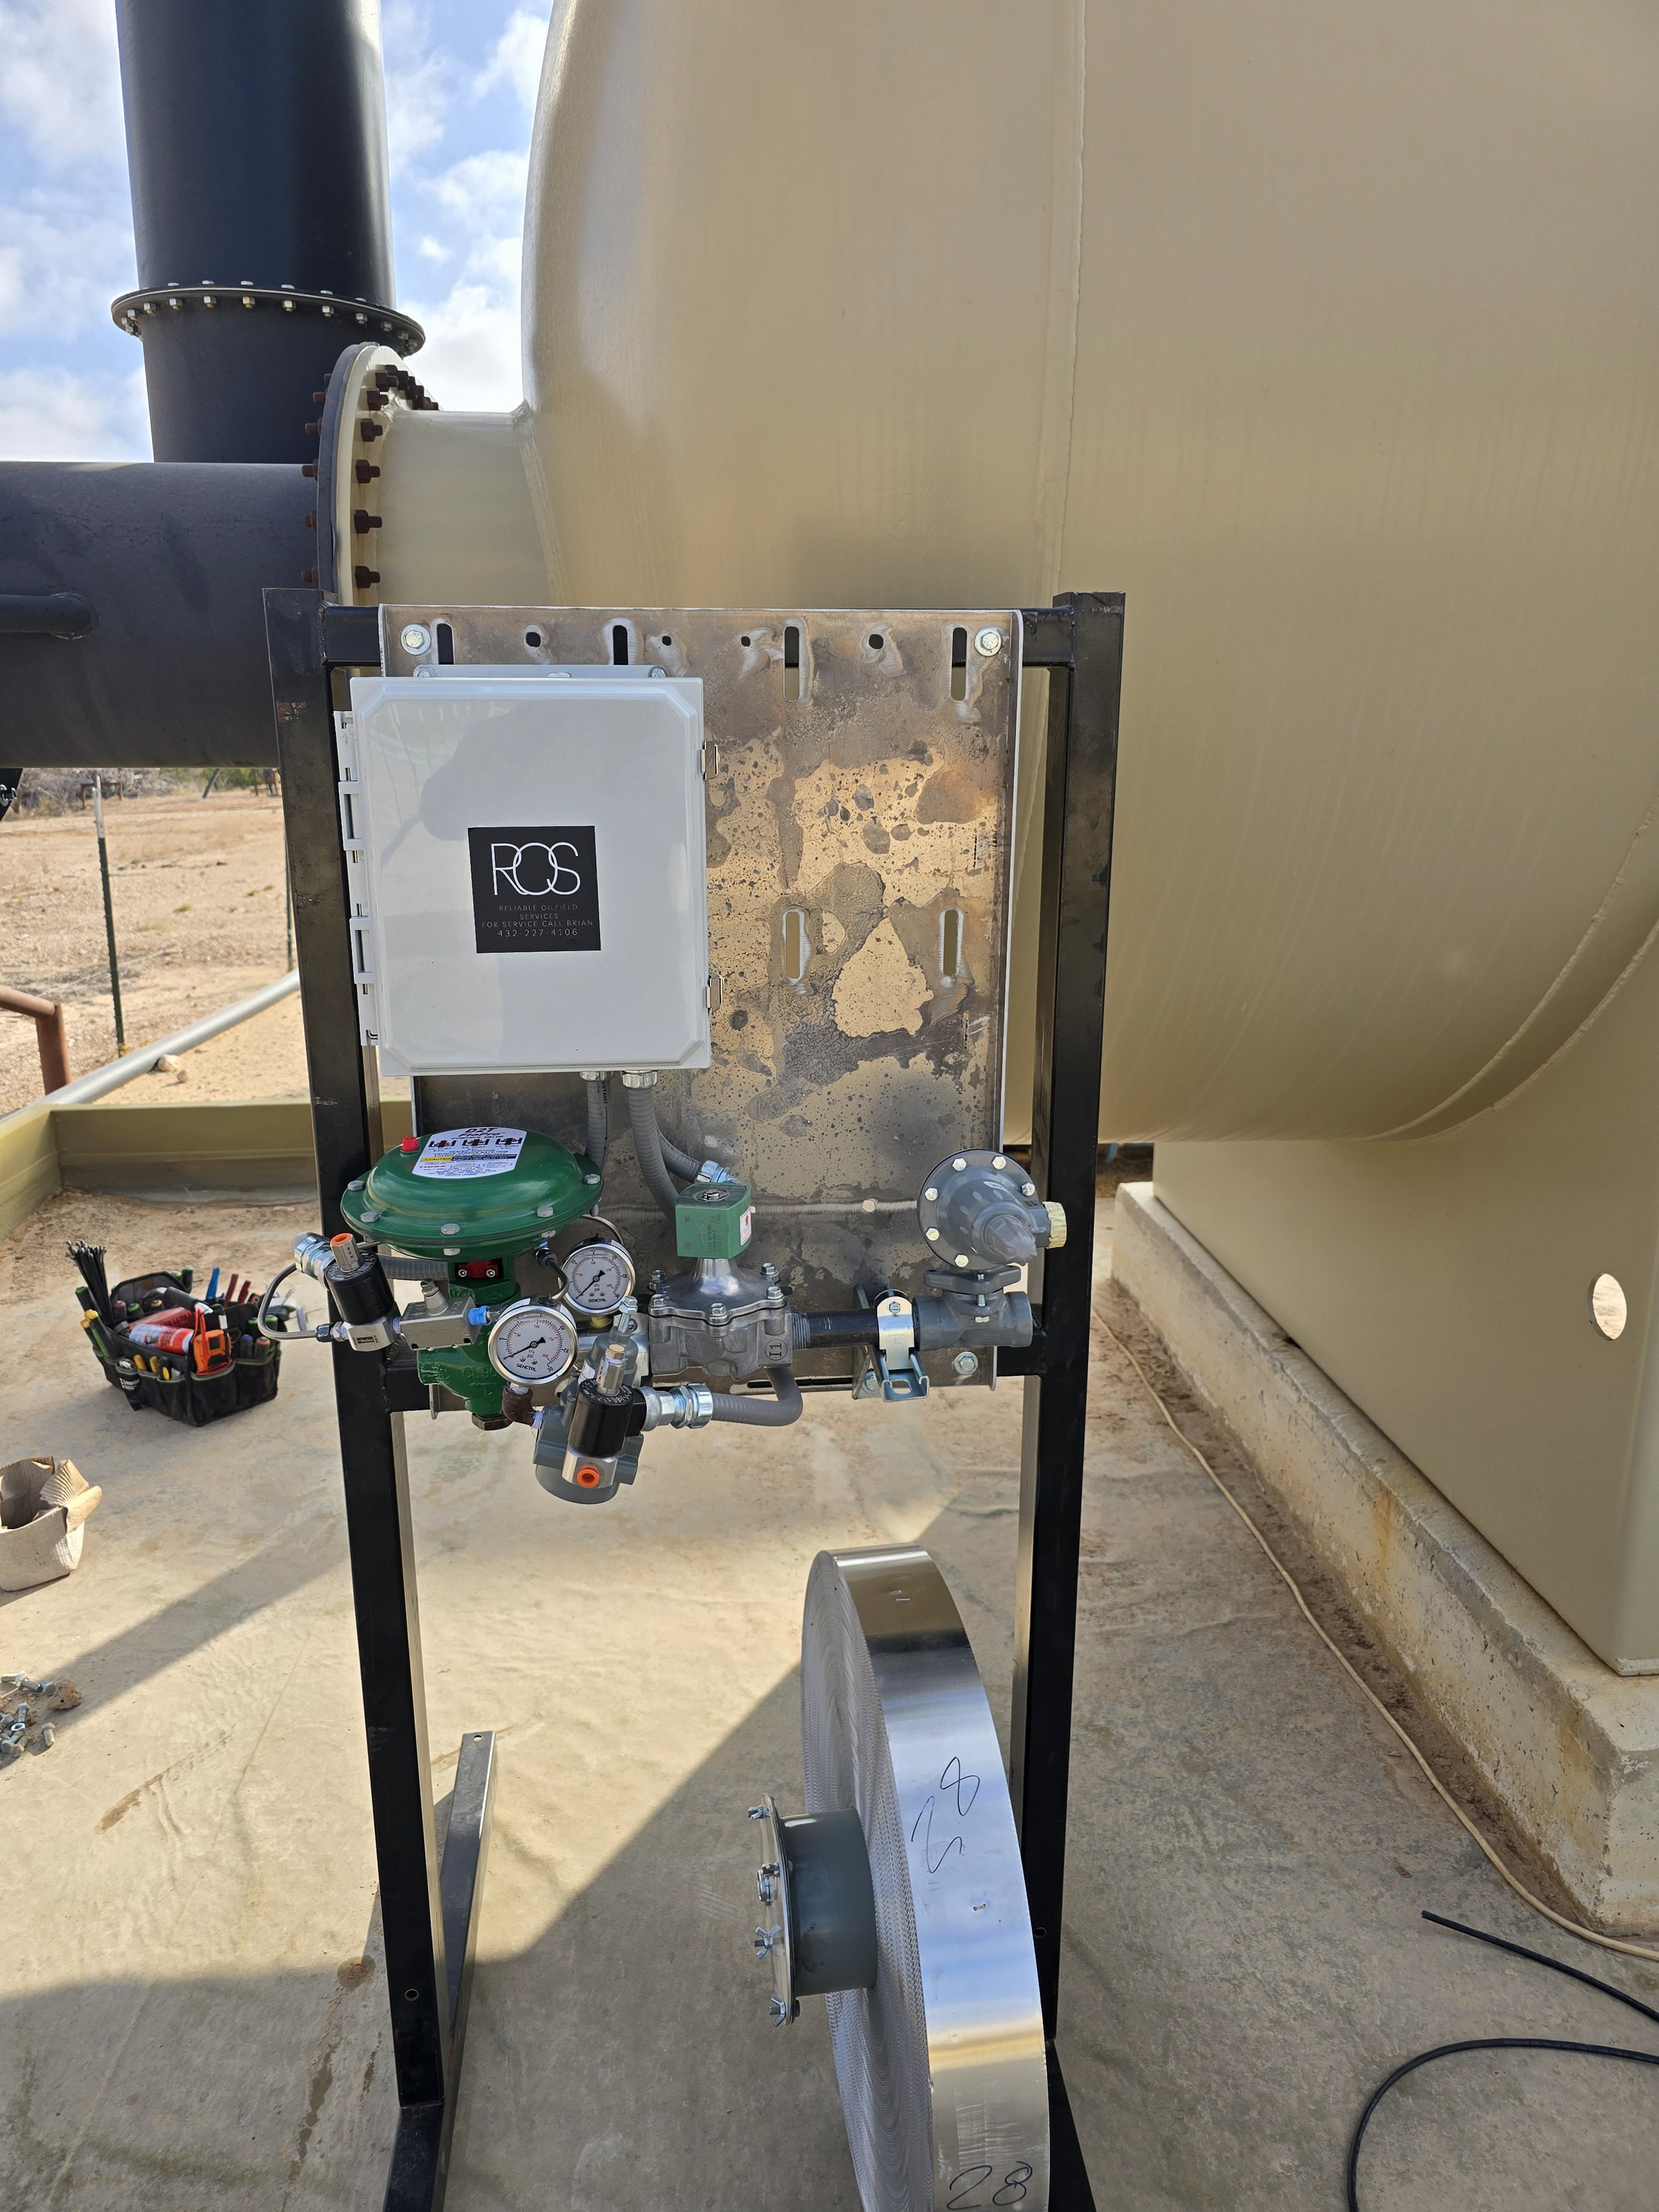
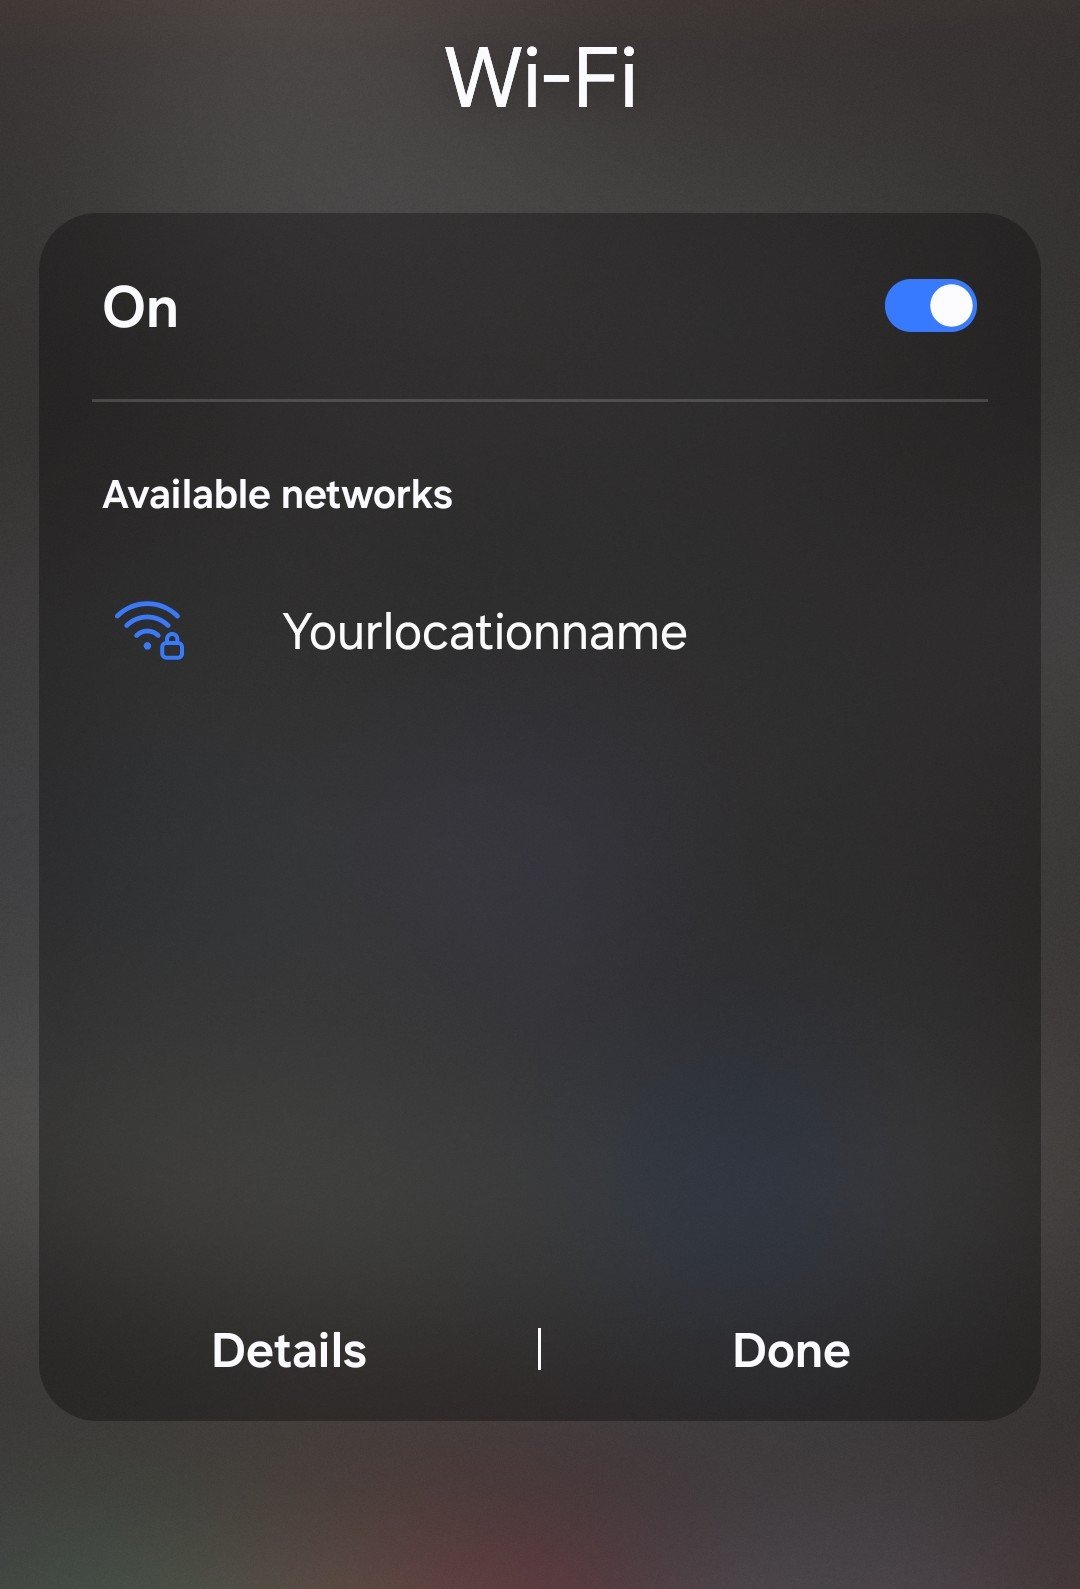
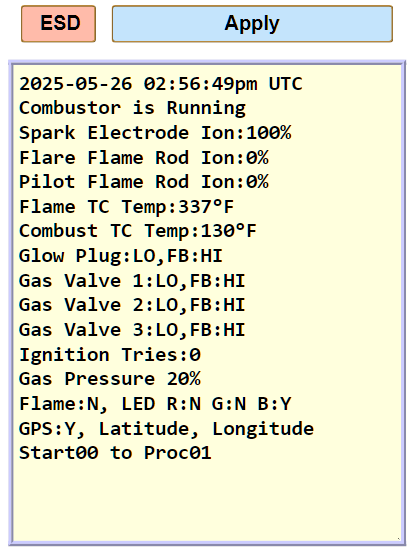
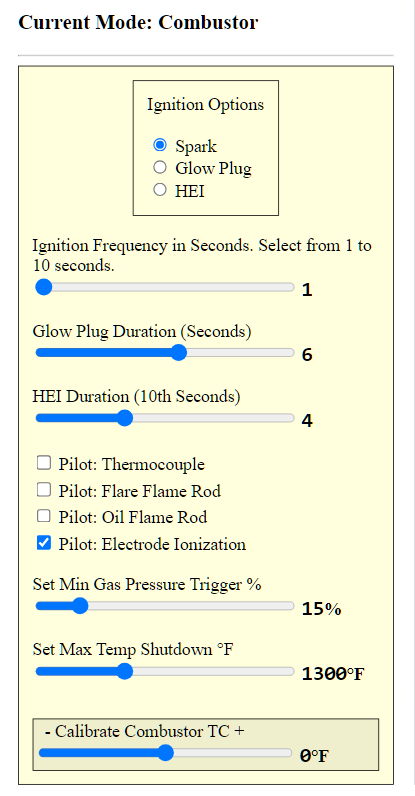
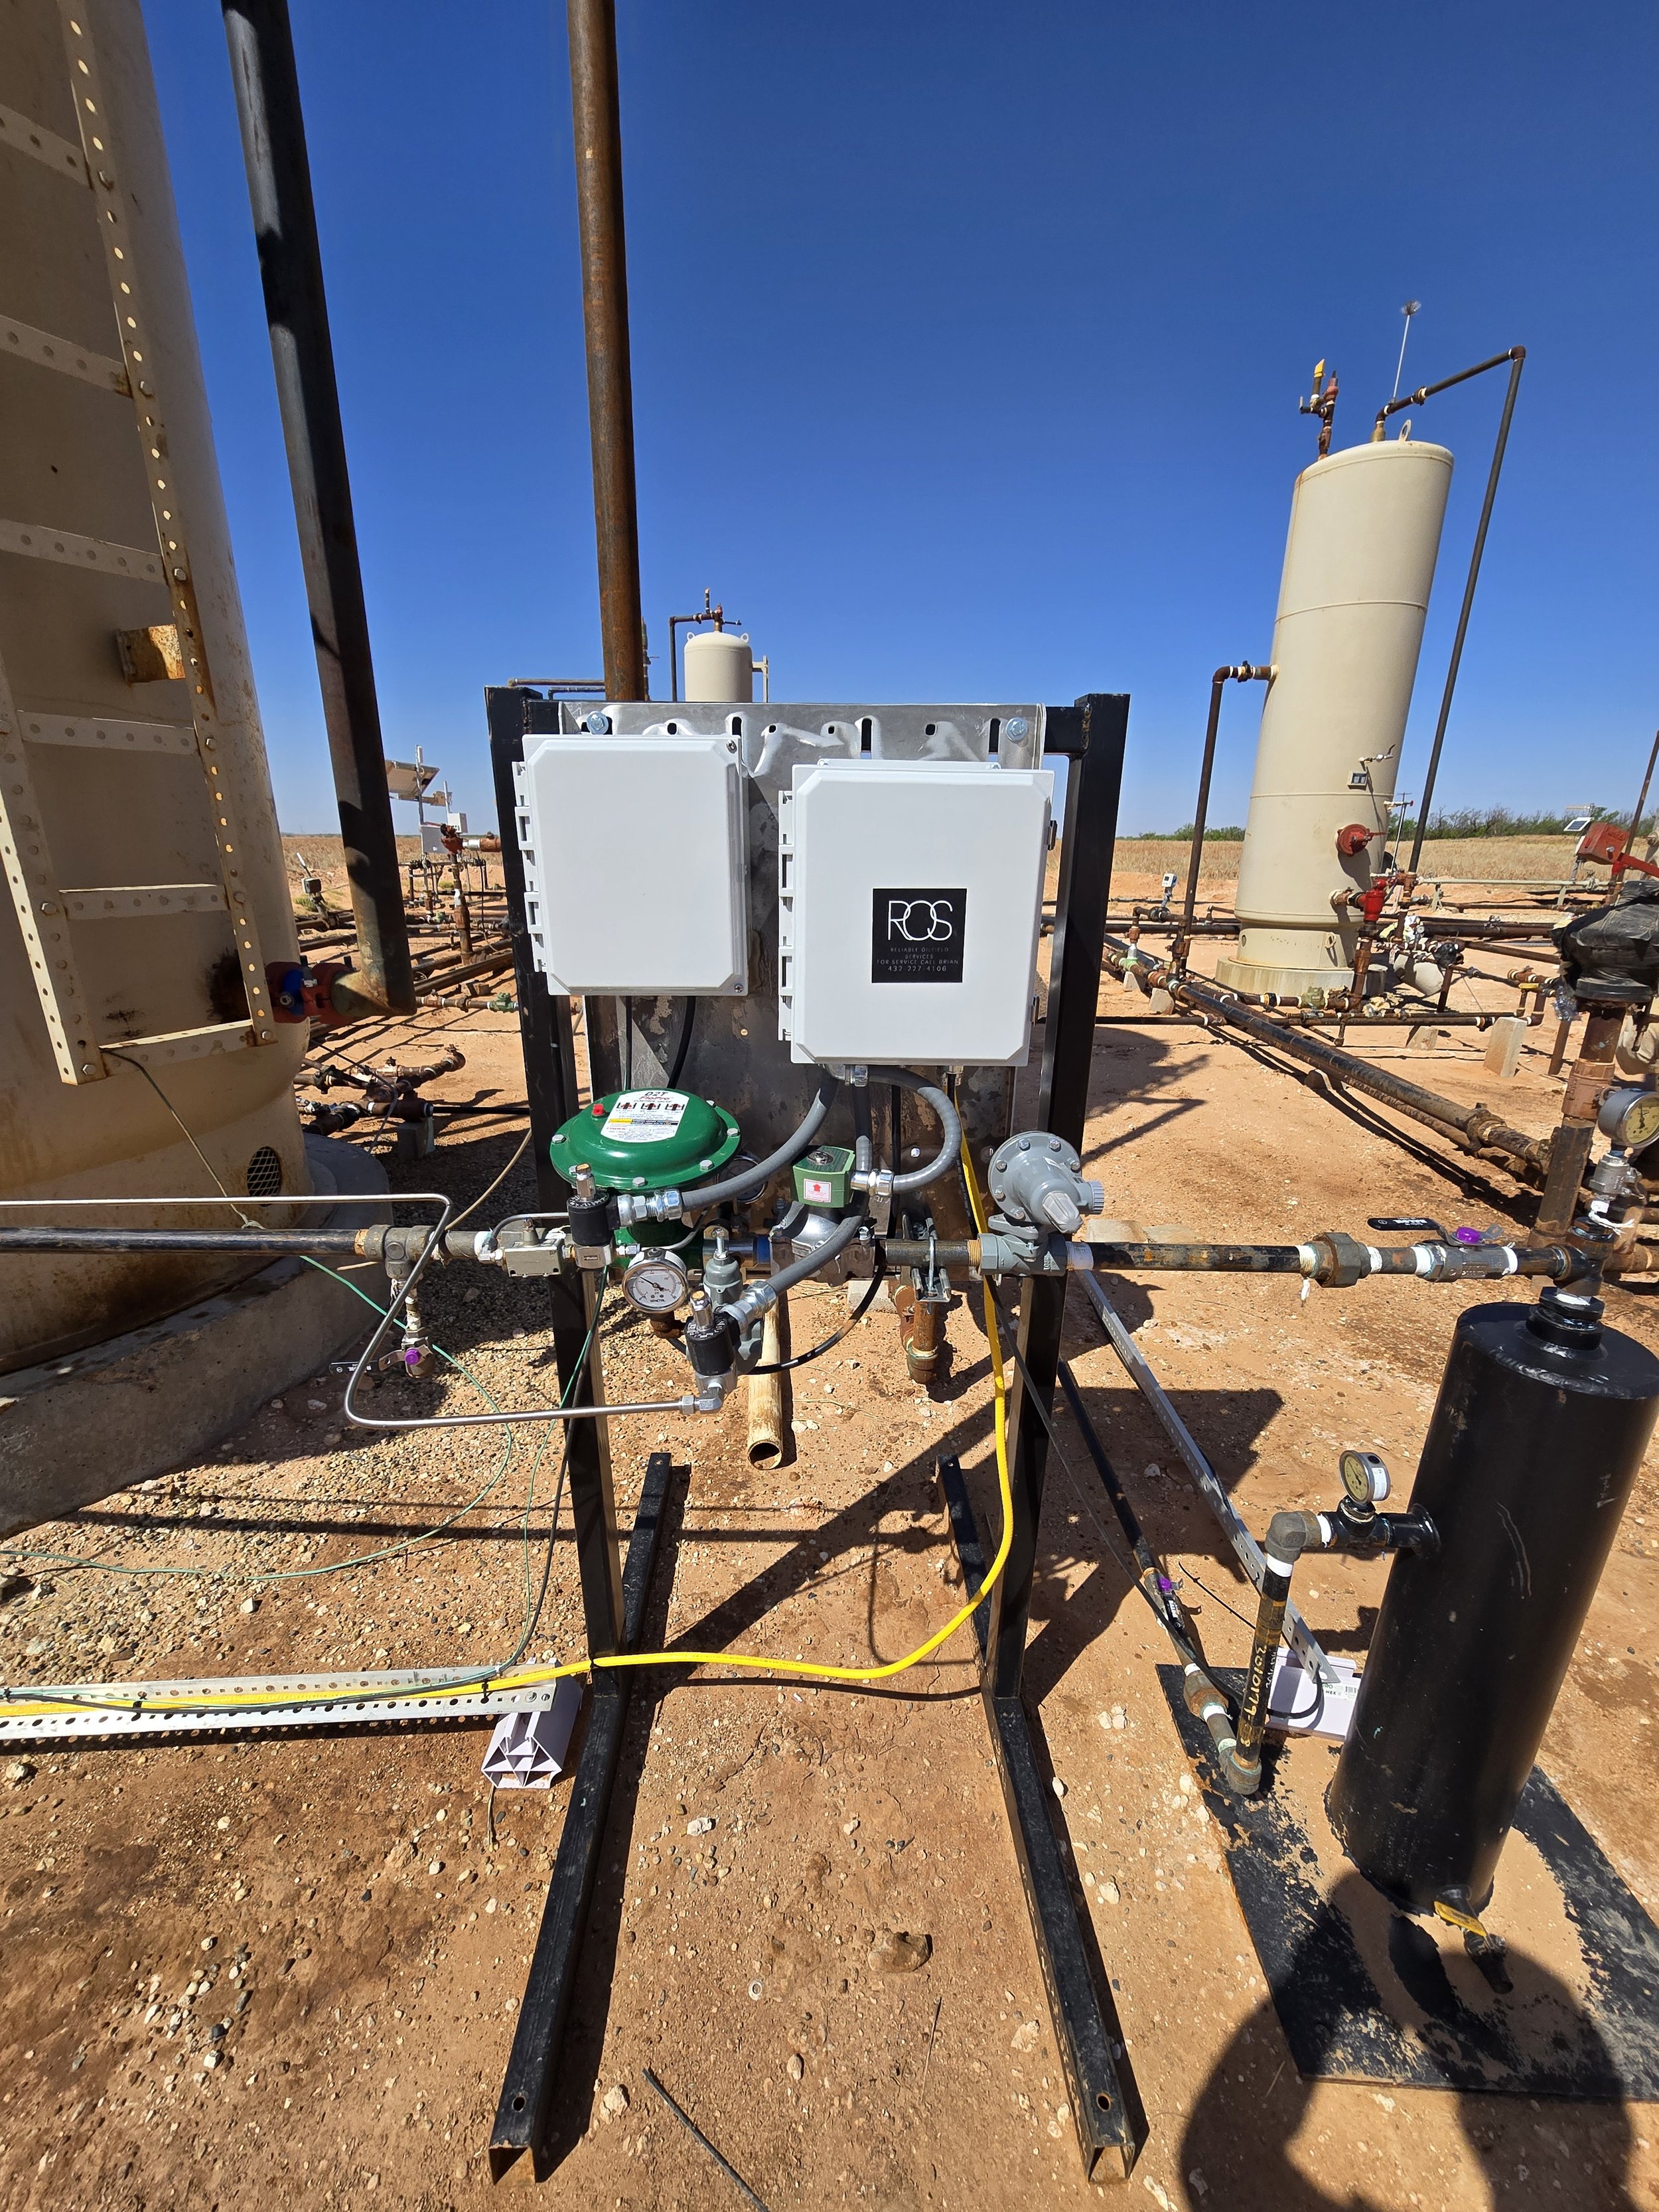
Smartphone-Controlled BMS


With smartphone-controlled Burner Management System (BMS) technology, operators can manage combustors, oil heater treaters, and flare igniters remotely, eliminating the need to navigate harsh conditions. This technology enhances convenience, efficiency, precision, and safety.

This technology drives efficiency, precision, and safety, positioning operators as industry leaders.

Table of Contents

  1. Introduction
  2. Connecting
  3. Specifications
  4. Installation
  5. Configuration
  6. Operation
  7. Troubleshooting
  8. Maintenance
  9. Technical Support
  10. Maintenance Program</a>
  11. Startup Procedure
  12. Monitoring Overview
  13. Live Monitor Readings
  14. Configuring the Oil Heater Treater
  15. VPN Configuration
All in One WiFi ROS BMS Controller, Flare Igniter, Combustor, Oil Heater Treater
All in One BMS
WiFi controlled
ROS BMS Controller
includes:
Flare Igniter
Oil Heater Treater
Combustor
Back to Table of Contents

1. Introduction

The Burner Management Controller (ROS BMS) is designed for oilfield applications, including flares, heater treaters, and combustors. It ensures safety, compliance, and efficiency with RoHS-compliant materials, UL-certified NEMA 4X enclosures, and Wi-Fi connectivity for remote monitoring and control.
RoHS-compliant UL-certified NEMA 4X enclosures
RoHS-compliant
UL-certified NEMA
4X enclosures
Back to Table of Contents

2. Connecting

Wi-Fi Connection Guide for ROS BMS

This guide explains how to connect a smartphone, tablet, or laptop to the BMS via Wi-Fi to access the control screen.

What You'll Need

Step-by-Step Wi-Fi Connection

  1. Turn On the BMS: Ensure the BMS is powered (check for green light).
  2. Open Wi-Fi Settings: Navigate to Wi-Fi settings and select the network (e.g., [flame] or [facility name]).
  3. Connect to the Network: Enter password 12345678.
  4. Open Control Screen: In a browser, type igniter.local.
  5. Save for Easy Access: Add igniter.local to your home screen or bookmark it.

Features

Connectivity Options
Connectivity
Options
Back to Table of Contents

3. Specifications

All in One WiFi ROS BMS Controller, Flare Igniter, Combustor, Oil Heater Treater
All in One BMS
WiFi controlled
ROS BMS Controller
includes:
Flare Igniter
Oil Heater Treater
Combustor
Back to Table of Contents

4. Installation

  1. Location Selection: Choose a dry, well-ventilated area away from direct sunlight.
  2. Mounting: Secure the controller using provided brackets.
  3. Wiring:
    • Connect power (12V or 24V DC) to input terminals.
    • Connect temperature sensors with proper insulation.
⚠ Safety Tip: Wear PPE and follow local electrical regulations.
RoHS-compliant UL-certified NEMA 4X enclosures
RoHS-compliant
UL-certified NEMA
4X enclosures
Back to Table of Contents

5. Configuration


Power Up

Connect all the wires from the peripherals to the BMS, then turn on the BMS power switch.

Wi-Fi Setup

  1. Open device Wi-Fi settings.
  2. Connect to the network (e.g., [flame] or [facility name]).
  3. Enter password: 12345678.
  4. In a browser, go to igniter.local.
  5. Save the link for quick access.
  6. Select the BMS that you need.
  7. Select Options.
  8. Monitor BMS.

Sensor & Ignition Settings

Common Pitfall: Ensure device is within 30-50' for Wi-Fi connectivity. Restart both devices if issues arise.

⚠ Change the default Wi-Fi password (12345678) during initial setup to prevent unauthorized access.
RoHS-compliant UL-certified NEMA 4X enclosures
RoHS-compliant
UL-certified NEMA
4X enclosures

Back to Table of Contents

6. Operation


What You Can View & Control

All in One Intuitive Display

Image
Back to Table of Contents

7. Troubleshooting

Troubleshooting Wi-Fi Issues

Tips: Stay within 30 feet of the BMS, change the default password for security, and save this guide.
Image
Back to Table of Contents

8. Maintenance

Image

9. Technical Support

Contact the ROS BMS support team:

Back to Table of Contents

10. Maintenance Program

Back to Table of Contents

11. Startup Procedure

  1. Wi-Fi Connectivity: Connect to the network (password: 12345678) and access igniter.local.
  2. Flame Sensing & Ignition: Select preferred methods.
  3. Emergency Shutdown (ESD): Locate ESD on the UI.
  4. Unit Type Selection: Choose Igniter No Feedback, Igniter Feedback, Oil Heater Treater, or Combustor, then press [Use This Unit].
Back to Table of Contents

12. Monitoring Overview

The system provides real-time diagnostics, including operational status, flame detection, temperature readings, and ignition feedback. Each value is clearly defined for easy interpretation.

Definitions

Image
Back to Table of Contents

13. Live Monitor Readings

Timestamp: 2025-02-20 08:25:20 PM UTC

System Status: Oil Heater Treater is Running

Flame Detection

Temperature Readings

Ignition & Gas Valves

Additional Diagnostics

⚠ System Alerts: Pilot Electrode may be Defective. Initiating troubleshooting.
Image
Back to Table of Contents

14. Configuring the Oil Heater Treater

This section outlines the configuration process for the Oil Heater Treater, allowing users to define ignition parameters, heating settings, and flame detection preferences.

Configuration Steps

  1. Ignition Type: Choose Spark, Glow Plug, or HEI.
  2. Ignition Frequency: Set interval (1-10 seconds). Example: If set to 1 second, the system will attempt ignition every second.
  3. Glow Plug Duration: Set duration in seconds. Example: If set to 6 seconds, the glow plug will stay energized for 6 seconds per cycle.
  4. HEI Duration: Set pulse length (tenths of seconds). Example: A setting of 4 corresponds to 0.4 seconds.
  5. Exhaust Test: Enable if temperature exceeds 1100°F for shutdown.
  6. Pilot Type: Select Thermocouple, Flame Rod, or Electrode Ionization. Example: If "Electrode Ionization" is checked, the system will use this method for flame verification.
  7. Oil Heating Target: Set temperature (°F, 3-degree deadband). Example: If set to 132°F, the heater will regulate the oil bath to this temperature.
  8. Calibrate Oil Bath: Adjust temperature controller using "- Calibrate Oil Bath TC +" buttons.
  9. Apply Settings: Save changes.
  10. Emergency Shutdown (ESD): Press ESD for shutdown.
ESD/Run Settings: Press [ESD] to shut down (changes to [Run]). Keep in shutdown mode during configuration.
Image
Back to Table of Contents

15. VPN Configuration

When using a VPN, accessing the ROS BMS on a local Wi-Fi network may require specific configurations.

Enable Split Tunneling

Exclude the BMS's local IP (e.g., 192.168.x.x) from VPN traffic in the VPN client settings. This routes local traffic directly while keeping other traffic encrypted.

Temporarily Disable VPN

Pause the VPN, connect to the BMS, then reconnect the VPN. Avoid sensitive operations while the VPN is off.

Configure Static Routes

Add a static route to direct BMS traffic (e.g., 192.168.1.100) to the local gateway, bypassing the VPN. Example (Windows): route add 192.168.1.100 mask 255.255.255.255 192.168.1.1.

Use a Separate Network Interface

Use a device without an active VPN to connect to the BMS.

Back to Table of Contents More intresting pictures
Image

Back to Table of Contents